Thursday, June 25, 2015

The Ranger Roll. Part one.

So my husband was in the Army. In basic training they are taught/re-taught how to fold clothes. ( I hear some mothers and wives out there singing "Hallelujah!") Shirts can't be more then a dollars length long. Everything has to be rolled and put away. Uniforms are often the exception and can be hung up ... blah blah army reg's speech blah... Anyway my husband brought the experience home. And it's one thing I can say that I can do BETTER then he can!
*Que the 5 year old in me as I say* "Nana, nana, boo,boo stick your head in doo,doo"


See the extra amount of space?!?! Ain't it amazing! That's a regular retail folded shirt on the left.
My apologies for the look of the suitcase my cat spilled coffee on it when unpacking awhile back.
Anyway, after many moves and trips I have got this style of folding down to a T. I can do t-shirts, tank tops, sport's bras, sleep pants/yoga pants, underwear and socks. In this blog (it's a two parter) I will show you how to do shirts, tanks and sports bra's. 

T-Shirt:
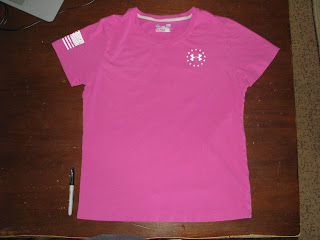
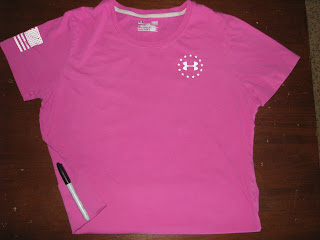
Take a regular t-shirt and lay it flat on it's back.


 Next, fold the shirt about two to three inches up back under the shirt.


 Fold at the collar of the shirt over. Keeping sure the bottom stays intact.
I can add a long sleeve tutorial for this as well.


 Next fold the opposite side directly over the old fold. If the sleeves fold over just fold them back into the shirt so you have this long skinny line. The bottom part will create a pocket in the back as you fold it.


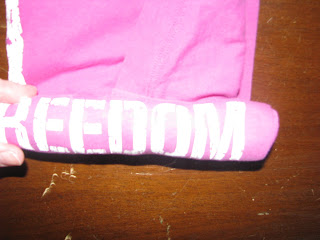
Flip the shirt to where the neckline is now facing you and the bottom is now the top. Make sure said pocket is still on the back of the shirt. (when I'm watching T.V or get distracted by the million other things moms deal with on a daily basis I sometimes flip the shirt to the wrong side and have to start all over again.) Begin your roll from the new bottom on the shirt where the neck is. And roll up towards the folded fabric.


 Begin your roll and roll it all the way till you meet the other fabric and keep rolling mind the back pocket.


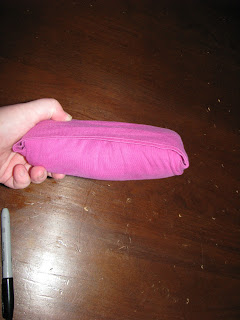
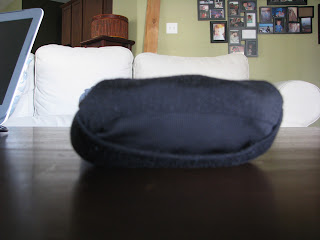
 Fold the pocket over the back of the shirt. Leaving you with a finished product like this.
Pull the pocket back over the shirt


 This little pill from works amazing when you need to pack a lot of stuff in a little bitty space.  In the army the sizes and standards are a tad bit different. I've fixed it to where it gets what I need out of it.


 The Tank Top / Spaghetti strap:
Pretty much the same thing. The only difference is the sleeves. Try and make it as flat as possible. I've noticed those shirts with the built in LIES I mean bra's can be hard to fold unless they are absent of padding.
Lay it flat on it's back and fold the bottom of the shirt up a finger length up.


 Next fold one side of the shirt over to the center. Then the other. Bunch the straps up at the top and begin to roll.


Fold it over again and remember to flip it.

Roll it up to the top again. And begin to pull the pocket back over the shirt.

 Sports Bras:
Same deal here. Sports bras are a tad bit trickier because there's less fabric to work with. But it can be done! I promise it can!


 Roll here but keep it tight and it will require both hands. But If you aren't careful you will pull the inside of the bottom up over the the fold and have to start over.


 So there you have it. My space saving tip that I never leave a for a vacation without doing. The best part is you can just about fit your entire closet into one bag. stacked up it little rolled pyramids. Stick around for a part 2 on pants, underwear & socks. There maybe a part three on organization.


 Coming soon part 2.


Wednesday, June 17, 2015

I haven't forgotten.

Just a quick update...
 I have not forgotten about the blog. I have a lot going on in my personal life right now mostly involving mold in my storage unit that basically has everything I own in it. I will have a full blog post on how we deal with this situation soon. A long with a few hacks, and furniture updates. Thanks -J

Thursday, May 14, 2015

Tattoo after care and things to consider.

Surprise, surprise I have tattoo's. (makes a Rosie the riveter pose. May she rest in peace) I'm such a rebel! Ha! no I'm not really. I'm really traditional. Seriously ask my friends.

My mom told me back when I was around 14 if I waited till my 18th birthday to get one she would pay for my tattoo. I took her up on that and waited. Weeks before my 18th birthday I figured out what I wanted and where I wanted it. My 18th birthday came around and she was true to her word. Took me to get my first tattoo. I had seen friends and at the time my boy friend get tattoos. So I got the general idea on how the process went.

Fast forward 10 years and I'm still in love with my choices. I do not regret ANY of them. However I do regret some of their placements (I'll explain later.)

What do I think my tattoo's are going to look like when I'm 80? They will look AWESOME. Seriously have you seen some of the old folks rocking tattoo's out there? I love em! <--- The old folks that is.


This is my thigh tattoo. It's not finished yet.

On to the after care...
  1. Get said tattoo. listen to your artist on what they say to do. Seriously.
Yes seriously, it's the best information you can get. The reason I am typing this at all is that I didn't always get after care information for my tattoo's and I forget easily as time has passed. But I've learned enough to know what works for me. I have sensitive skin. Pale skin that shows ink really well. And the after care I use is a combination of information given to me by various artists. If you lose your instructions or want to know what your getting into read on.

So this is what works for me.
 (use caution and at your own risk. A tattoo is an open wound. Treat it like one.)

  1. Do research on artists and shops, make sure they are clean and reputable, get your tattoo. (In Texas they must have a license)
  2. Leave plastic cover on for an hour then remove.
  3. Wash the tattoo with a light anti bacterial soap. I highly recommend Tattoo goo. (see reference below)
  4. Pat tattoo dry with a clean towel.
  5. There are slaves, balms, lotions and creams out there. I've used everything from Black Cat Tattoo Aftercare, A&D cream, to a homemade one and I still prefer Tattoo Goo. Add a small amount and rub in. It shouldn't look like a glazed doughnut. Just have a shine to it. DO NOT RE COVER.
  6. Wear light clothing that won't hug the tattoo (or depending on the placement none at all) Change your sheets to ones that your don't care about or dark ones because the tattoo will ooz..
  7. Keep it dry but if it gets itchy use some tattoo safe lotion, it will keep the skin from being tight and drying out to quickly. IB profen helps swelling.
  8. Continue this process for a week. When it starts to look like this.
  9. When it starts scabbing the goo helps with the itching. Don't scratch at it. Resist the urge! ha ha easier said then done. Some people lightly slap there's some have said scratch the opposite side of the body. I just try to keep myself distracted.
  10. Shower only for two weeks, Forget about baths/pools/hot tubs/lakes etc. 
  11. If you must cover it use a light breathable dressing. 
This is what hasn't worked for me/friends or significant others.
  1. Keeping salve on it the entire time. (it became to wet and led to infection. The tattoo ended up having to be re-done altogether.)
  2. Having tight clothes on (led to removal of scabs to early and lost tattoo pigment in the skin.
  3. Picking. I have had friend pick the scabs. Yuck and it has the same effect listed above.
  4. Gone to the lake. Please..don't..do..this.  Think about all the bacteria in the water..think of it getting into an open wound. Add to that that your not supposed to submerge your tattoo for two weeks or until healed.
Having an infection, knowing it's infected and not seeking treatment. (Ick and DON'T DO IT) if it looks infected seek medical attention for it right away. When it turns into a nasty smelly mess you can also get a messed up tattoo for life or a blood infection that can lead to death...  

See the spots where the color is faded? I got a slight infection. (no where near a friends magnitude.. his was bad) Then do to tight clothes, removal of scabs which took out the ink. I can get it touched up for free. Always be sure to ask the artist about it.


Ah yes Tattoo Goo.
 This amazing stuff has been around a long time.. One of my tattoo artists has recommended it since the 80's. I found it a couple of years ago in Walmart next to the stretch mark cream. And he was all for the use of it. I have never gone back to the other products it works that well.

 This is what it come's with.
  • Tattoo aftercare lotion. 95% natural olive oil formula, enhances color of new & old tattoos. Dermatologist tested and made in the USA. This stuff is amazing. A small amount goes a long way.
  • Deep Cleansing Soap for Tattoos and Piercings. Anti bacterial. Antimicrobial pH balanced. This is what I use in the shower. You just put some in your hand and lightly wash the tattoo then rinse it off. Warm water is fine hot water you will feel pain. Also can be used on minor cuts and scrapes.
  • Tattoo Goo Balm. Enhances color on new and old tattoos. Does not clog pours and can be used in everyday skin care.
  • Tattoo Protection Color Guard*. 30 SPF uva/uvb sunscreen. Preserve & protects rich colors. And smells like a coconut. I added a star because this is something on my considerations list below. 

Things to consider:

Maybe this is your first tattoo, maybe your considering letting your child (18 yr.+ child) get a tattoo, maybe you just want to know about tattoos...

Will it hurt?
Did you ever see the movie Son In Law with Poly shore? They go to get a tattoo and she asks if it will hurt. The artists response was "It's better then a kick in the face with a golf shoe." Well that's a little much in my opinion. It's 2-7 needles literally in your skin at a given time. So yeah it hurts.No pain, no gain. But it depends on where your getting it and your pain tolerance as well. My husband the big strong man he is ... faints. (I love him anyway) For me it helps me relax. I know I know I'm crazy right? I'm a red head we feel pain differently. (seriously look it up) At first it feels like someone is scratching a sunburn then for what ever reason I stop focusing on the pain and relax. 

If you get the chance go to youtube and watch tattoo in slow motion. It's amazing.

What do you want and where do you want it?
If your like me and a lot of tattoo addicts out there they can tell you the first tattoo is the hardest to pick. After that you know what you want almost immediately. My first tattoo, I knew what I wanted and where I wanted it. This is where the placement part of my story comes into play. I got it on my back between my shoulder blades. I LOVE this tattoo to this day. But I can't see it. Unless I look in a mirror it might as well not even exist. And when you want to get a tattoo your going to want to see it right? This one was also right over my spine. It's not an easy place to get tattoo'ed for a first timer.

Sun and sunscreen?
The sun isn't good for your skin. We all know it. Use sunscreen people. How ever I'm a redhead. I think my husbands favorite joke is "I knew a Ginger who went outside once...It exploded." Me and sun don't mix lol. You know what else doesn't mix? Sun and tattoo's. It will cause them to fade unless you use sunscreen. Here's the kicker... Some sunscreens pull the ink out of a tattoo especially a new one causing it to fade. Google a sunscreen that is tattoo safe before use. 


Comments and criticism?
If your tattoo can be seen someone at some point will say something about it. Here's the top 5 I have heard.

What does it mean? (they don't all have a story)

Your body is your temple why would you do that to it? 
I'm very happy to decorate it. I think its lovely. It's my shield and brings me peace. Reminds me of a quote I once heard. " What if tattoo's just showed up at key points in our lives, and we had to figure out what they meant?"

Your mother must be proud. (insert rude sarcastic tone here.) Followed by "I feel bad for your parents" Gee whiz miss lady.. What crawled up your butt and died. I literally was sitting with my family when this happened.

You'll never get a job with those tattoo's all over your body. (wrong)

Those are BEAUTIFUL the artist has done a wonderful job. (these are the ones that make you proud. You are wearing someones art. Someones talent and creation.)

I also had one dad cover his young daughters eyes and move her away from me. That was interesting. 

** None of my tattoo's other then the fact that they are tattoos are considered offensive. I have no nudity, bad words or derogatory tattoo's. Most are family related.

Just expect it. Good and bad. People will say something or point. It's something you have to get used to.


Can I touch it?
Ha! I don't condone this... but I've had people come up to me and and touch the ones on my arms without asking and it irks the heck out of me. It stinks but it's something you'll have to deal with. Be grateful for the ones that ask. I've also gotten the "I'll show you mine." Which is mainly from drunk people. Something else I tend to avoid..

Stretch marks?
I have asked a couple of artists over this one and have personal experience. Here's the deal with it. You can tattoo over stretch marks. But not something you want perfect lines on. I have some ink bleeding (bleeding is the ink seeping into the surrounding skin making it look blurry.) into the tattoo of the Kracken in the photo above. But you can't see it unless you look closely. Words or sentences wouldn't work. And as you can tell from the middle picture they swell like crazy and hurt a bit more then the rest of the skin around them. 

How is it going to effect your future?
Does anyone know what their future holds? Some jobs are discriminatory. I know that. But I personally don't want those jobs. They are not what I'm into.  For some people they just cover up their art with long sleeves and pants. Others with make up or band aids. As far as I know I'll still be proud to rock my ink if I make it to my 80's because I MADE it to my 80's. My ink is my story. I will not be ashamed. Getting a tattoo isn't as permanent as it used to be but I have no intention of going through more pain of getting it removed. So I make sure I'm dedicated to the ones I do decide to get. 


Where did you get them?
If someone wants to know where you got your tattoos tell them. Your helping them and the artist. Most artist and shops have stickers and cards laying about. At the shop pictured above they always have a bowl with stickers in it they give away in bulk. Next to it are the shops cards and the the artists appointment cards. I say take as many as you want and keep them with you to hand out. It makes all the difference in the world when asked to be able to hand out a card.


My experience.
I'm not going to show all of my tattoo's on this page. Not because I don't want you to see them. Heck ask me and I'll show. But it also makes me identifiable in a public setting and I'm not comfortable with that yet. I have 13 tattoo's 3 of which are very large. I plan on filling up as much of my canvas as I can being so short. I have friends and family members that have had 200+ hours under the needle all together. And my tattoo artists know me by name. If you have a question please feel free to ask. 


After a song by Otep a metal band.
"Your perfectly flawed,
Perfectly incomplete
Let them condemn,
Imperfections will keep you unique.


Monday, April 27, 2015

Red bench rehab

This is actually an old upcycle. But it's one of my favorites!!!


I had gotten this bench from a friend while we were living in Georgia. We were about 45 minutes away from Savannah so we would get salt air and humidity you wouldn't believe. Seriously you'd walk outside and feel like someone left the shower on! Doing your hair? Forget it. 

It all adds up to your outside furniture quickly rusting and looking old and weathered. Quite fitting for the area. I did truly love it there don't get me wrong it was beautiful! Just didn't like the humidity and the bugs. The difference in Texas is it's a dry heat. Sticking your head in the oven vs. hell's sauna. Back to the point.... I know I know. Anyway. This bench sat there on my porch looking the same way as I got it. Sometimes it would move to my back porch that had even less cover from the weather.


One day close to the time we were going to move to Texas I decided to use up spare paint I had left over. So I sanded the bench lightly down. And covered the patio. I took a can of Rustoleum Universal metallic Hammered look in the color black, and sprayed the metal legs and backing. Being sure to cover any rust spots I found. Then I started on the wood. I took the rest of a barn door red can of outdoor paint and painted all of the wood parts of the bench making sure I got full coverage. Followed that with a Valspar antiquing glaze and rubbed it over the entire bench and then really good into the area's I wanted to "antique." left for twenty four hours to dry then took a two cans of polyurethane and sprayed the entire bench down. Left to dry for another twenty four hours.


Here was the finished product. All the neighbors fell in love with it. This bench has since survived four more moves and two hail storms. It's color is holding up perfectly.  I'm a firm believer that paint solves everything. Whether it's the color of a room or an old bench that just needs some TLC. 

Have an upcycle you have done that's one of your faves? I'd love to hear about it.

Sunday, April 26, 2015

Cleaning Copper Hack

How to clean copper
 If you have copper pans or are just a collector of pennies. I have a trick to make them look like new!


We've personally had these pans for ages. Family member through family member. Over the years I've learned a few tricks to bring the copper back to life. Granted if you looking to get the black burned on portions out I can't help with that... But taking the tarnish of I can.

Half and half
Here's what you'll need:
  • Table or sea salt
  • Apple cider vinegar / or white vinegar apple stinks but works best.
  • An old rag
  • Spray bottle (you don't have to have this one but it makes it easier.)

Lay down a towel and lay down the pan you are working on. This one is copper bottom so I just turned it over. Spray the bottom of the pan with the vinegar. And sprinkle on the salt. The chemical reaction will be noticeable right away. Then scrub hard rub the mixture all over the copper. And as you can see in the top picture the tarnish clears and the red copper comes back to life. Next wash the pan entirely with soap and water. The vinegar is not good to leave on for to long.

If you have a penny collector you can use the same trick.


I put the penny's in a bowl with salt and the vinegar and swished them around the bowl for about 15 minutes then rinsed. Didn't scrub them or anything. It brought all the color back to life and you could see the tarnish come out while dumping the water from the bowl. 

I do warn to use a well ventilated area. The whole process is a chemical reaction. Breathing in the fumes can harm those with asthma or lung issues.


Thursday, April 23, 2015

Stain removal of fabrics.

My family like any family has spills and messes. Almost daily I'm left trying to get various stains out of clothes, furniture and carpet.

How to clean fabrics:
These chairs are from World Market. They have a rough fabric that stains easily and is subject to daily cleanings. They are not scotch guarded though I highly recommend doing so if you have chairs like these. I'm getting to the point I swear. 

Here's what I use:
Regular Heinz white vinegar, Lemon essential oil, you don't have to. I just think it smells better. dish soap, Dawn and Gain have worked best. Use one to two drops of soap and oil, one part vinegar, three parts warm water. Using an old rag drip the solution over the stains. Scrub hard. Once clean I use a dry towel and press into the chair to soak up any excess water. And leave to dry.


So far the list of stains this solution has removed:
Red wine, sweet tea/cool aid when done immediately, spaghetti sauce, cake icing, water color, ranch dressing, chocolate, hair dye and Cheetos.

The list it hasn't removed:
Tea and cool aid once it had been left for a couple of days, some sort of oil based product, school paints, and nail polish.

I have also used this product on brown microfiber couches with much success.


My husband was a medic. While in training he would come home on weekends and I would wash his uniforms. I found a few tricks to getting all of the stains of you can guess what being a medic out.

Normal spray and wash doesn't really work on these uniforms. For what ever reason the ACU (army combat uniform) retains stains like nothing else. I have found that this solution works amazingly well. So much so I've used it on everything from carpet, clothes to bloody sheets. (cat had just had surgery and slept with us that night. So not pretty in the morning) 

These are simple everyday house hold products that do an amazing job.
Dawn Dish Soap (the blue bottle) Hydrogen Peroxide and baking soda.
I've made a paste out of the baking soda and dawn before then put the HP over it for really tough stains like dried blood.

However turning it into a solution works amazingly well. Add to a bowl two parts HP and one part Dawn and Baking Soda. Stir together and rub/scrub into the garment. I used a regular bristle brush from the dollar store. Let sit for an hour and wash the item as you normally would.


For use in stain removal in carpet. Always test a spot first! 
We have beige color carpet and two dogs, two kids and three cats. It equals a never ending source of stains! Add same solution over the stain, let sit for an hour and use a steam cleaner or rug doctor to remove the paste.

Both vinegar and baking soda help with oder control. I highly recommend the use of either on stinky stains such as vomit or fecal matter. TMI if you have to clean vomit/poo out of carpet I recommend first putting baking soda over it and scraping the "matter" up with an old spatula. Helps with the smell and the removal. We have used vinegar to clean vomit out of the car and it did help the smell. But I recommend leaving the windows down as much as possible for the next couple of days. Then use a machine carpet cleaner when possible to remove any excess.


(I removed some of the pictures for the safety of my family. I will try to have more up ASAP)


Tuesday, April 14, 2015

Inner rambling and some peace.


Some of the best things ever written come from a source of great pain.

Laying here in my bed cheeks red and wet with tears with my husband's arms around me and my favorite cat snuggled close to my side. Both trying to lend me what solace they can as the months of stress build up finally break the flood gates and I decompress everything bogging down my mind.

Today I planned on getting up going about my normal Tuesday routine. And honestly I have no idea from how the time I got up this morning to the time I'm posting this led to a complete and under emotional deluge I didn't see coming. Seriously it was only an hour.

Which leads to what I had posted on my facebook directly before this blog page. The only thing I can think of that led to this cataclysmic event was that I almost ran out of gas this morning taking my already late kids to school and came home to cat vomit almost like a he left a present right before the door to my room. Which isn't a big deal this is every day stuff that just happens right? And then... my brain went into overload and unleashed it's fury on everything.

It's no secret. As women we let things get to us. Build up. And mentally brake us. We are so busy in our lives we push everything mentally aside to deal with later. When that later never comes it erupts in great emotional torrents of pain, anger, sorrow and shame. Makes me envious of men sometimes. So easy it seems. They either explode on the spot and move on or they seem absent of emotions all together. Grass is greener maybe.

 As I'm writing this a quote I saw a long time ago on a shirt came to mind "some days it's not worth chewing through the straight jacket." Ain't that the truth? We are all a little crazy and somewhat broken by own own experiences. Someday's you just have to mentally check out and deal with it all. Knowing I'm not as alone as I feel in all of this helps. I have the right people by my side and someone I can always reach out to. Isn't that the least we can ask for?

I end this blog with words to a song. It's Change Your Mind by Sister Hazel. If you'd like to look it up. Because I can't think of  a better way to word it then they have.

"Hey, hey,
Did you ever think there might be a better way
to just feel better about today?
Oh no,If you never wanna have turn and go away
You might feel better
if you stay
Yeah,
I bet you haven't heard a word I've said
yeah,
If you've had enough of all your trying just give up the state of mind your in.
If you wanna be somebody else
just tired of fighting battles with yourself
if you wanna be somebody else change your mind.

Monday, April 13, 2015

Faux mirror top bedside table.


Hey ya'll!
  We got bedside tables that have been in the family a loooooong time. Not quite antique yet so I had no problem with the idea of painting them. This is the "after" effect of the antique mirror look.


This is what it looked when I first got it out. Beat up. And changing colors?


The table its self is all wood. Minus that top center piece it's a hard laminate, that as you can tell was changing color due to age. I loved these tables they were my grandma's, then mine, then my moms for the last 6 years and now mine again. Our bed is a white metal frame from ikea. And I just wanted it to match a little better. Before we change the color of our bed. Another story for another date.

Have you ever seen those old pie servers from back in the day? With aluminum tops and cherry/walnut wood surround? Well the aluminum look is what I was after. And I didn't want to spend any cash on it. So I looked through my stash of dun, dun, dun SPRAY PAINT. It's really amazing what you can do with that stuff these days.  Anyways I had a past project of making vases look like Mercury glass. OMG if you only knew my love addiction to that kind of stuff! ( and if you want a blog about how to do that message me and I'll post a how to. Its easy I swear!)  Where was I? Oh yes. Mercury glass. There's this product called Looking Glass from Krylon spray paint. I searched high and low but did not have any luck finding it.  How ever I did find this stuff -->

Rustoleum Mirror Effect
It's not as shiny so it doesn't give the exact look I need for my MG projects. But it does still look awesome in it's own way! And definitely suited my current needs. So I washed the top of the table down. Didn't bother taping anything off. I just went with the flow. In the back of my mind I kept quoting my art teacher from Elementary school. "There are no mistakes in art. If you don't like the way somethings looking change it. It's never ruined." 


I kind of loved the way it looked right then. Hi, my name is Janna and I have an addiction to mercury glass...I know.... No need to worry it was just the drying process with the lighter being the parts dried. The thinner coat you use on the top the more of what you'll see under it that was original. I only did one thin coat each with a few good dark spots to give it the look I wanted. You can sort of see it here below.


After it all dried which I have little patients for  ( Have I mentioned I'm a redhead, I'm Irish, I'm an Aries, I'm only 4 feet 11 inches tall and a woman? Needless to say I have an attitude. I'm lucky my husband can put up with. It's a running joke that the odds were stacked against him lol) So I waited all offffffff about 30 seconds to bring it in. Then I sat down on my bedroom floor and began to paint. the same favorite color of Annie Sloan Chalk paint. Which I'm now out of! Drats! In the color Old Ocher. It took two coats of chalk paint to get the fullness I wanted out of it color wise. I didn't want to distress the paint on this project....


**I forgot to take an in between picture but here are the drawer pulls before. Just brass ones. That I used the same Mirror effect on.

 All I can think about when I actually look at these are the doors in the movie The Labyrinth. You remember the ones she had to take the knocker out of their mouths to ask questions?


Any way here's the finished product of my 4 hour labor. I did two end tables at once. So my husband's is finished to. 
 You can see that it does reflect some. And with more coats it will reflect more. If you really want a mirror finish I suggest the Looking Glass one. This one is more for antique style looks.


The table painted and put together. I really fell love the detail in it. On the sides its got more.


Annnnd I love how it turned out! Exactly the way I had pictured it! Slightly old aluminum. Who knows one day I may add some rust looking spots.... Or not.


From afar. This is my side of the room. My husband and I's taste is pretty similar. But they differ on the fact he has a huge Dragon on his night stand. One day I'm going to change the color of the bed frame. So it's not a prefect match. But you know what? I'm over that look. But I'm proud of the way it looks, it's mine I put the effort into making it mine. And no one else in the world has anything exactly like it. Well for now anyway. I hope you find something soon and make it yours. There are no mistakes.

For now Goodnight to all. I Hope you have a wonderful day/night where ever your from.